Build a voting dapp
Web3 values such as transparency, trust and decentralization naturally lend themselves to decentralized voting, where removing intermediaries and ensuring transparency can significantly enhance the democratic process.
This tutorial walks you through building a simple voting dapp, and you'll learn how to write, deploy and interact with a smart contract designed for a decentralized voting process.
Prerequisites
- Install Node.js and a package manager (this tutorial uses pnpm).
- Create an Infura API key.
- Install the MetaMask wallet and fund it with Linea Sepolia ETH.
Steps
1. Set up your project
Create a new project using the Create Web3 Template CLI by Consensys.
This command line tool simplifies the setup process by providing all the necessary tools and integrations out of the box, including MetaMask SDK, Linea support, Infura integration, and a selection of templates to choose from.
-
Open your terminal and run the following command:
pnpm create @consensys/create-web3-template -
You'll be prompted to specify a name for your project. Name it
simple-voting-dapp:? Please specify a name for your project: simple-voting-dapp -
Next, select the Next.js framework for your frontend:
? Please select the framework you want to use:HardHat VanillaReact❯ Next.js -
Choose Hardhat as the smart contract development environment:
? Would you like to use HardHat or Foundry?❯ HardHatFoundry -
Select your preferred package manager. This tutorial uses pnpm:
? Please select the package manager you want to use:YarnNPM❯ pnpm
The CLI will generate the project based on your selections.
Project structure
After the setup is complete, your project directory simple-voting-dapp will have the following
structure:
simple-voting-dapp
├── packages
│   ├── site          # Frontend built with Next.js
│   └── blockchain    # Smart contracts using HardHat
├── pnpm-workspace.yaml
├── package.json
packages/site: Contains the frontend code of the dapp, built with Next.js.packages/blockchain: Contains the smart contracts and related scripts using HardHat.pnpm-workspace.yaml: Defines the workspace configuration for the monorepo.
2. Install dependencies
Navigate into your project directory:
cd simple-voting-dapp
Install all the necessary dependencies:
pnpm install
This command will install all packages for both the frontend and backend components.
3. Verify the setup
To ensure everything is set up correctly, run the development servers.
For the frontend:
-
Navigate to the
sitedirectory:cd packages/site -
Start the Next.js development server:
pnpm dev -
Open your browser and go to
http://localhost:3000to see the frontend running.
For the backend:
-
Open a new terminal window.
-
Navigate to the
blockchaindirectory:cd packages/blockchain -
Compile the default smart contracts:
pnpm hardhat compileThis will compile the sample contracts included in the HardHat setup.
4. Configure .env variables
Update the .env file in the packages/blockchain directory with the following values:
# Infura API key for connecting to Ethereum networks
INFURA_API_KEY=your_infura_api_key_here

# Private key of the account to be used for deployments and transactions
ACCOUNT_PRIVATE_KEY=your_account_private_key_here
- Replace
your_infura_api_key_herewith your Infura API key. - Replace
your_account_private_key_herewith the private key of the Ethereum account you will use for deploying the contract.
5. Create the voting contract
Create a Voting.sol file and add the following code:
// SPDX-License-Identifier: MIT
pragma solidity ^0.8.0;

/// @title A contract for a voting system
/// @author [Your Name]
/// @notice This contract allows for the creation and management of a voting system
contract Voting {
    /// @dev Struct to represent a candidate
    struct Candidate {
        string name;
        uint256 voteCount;
    }

    /// @notice Array to store all candidates
    Candidate[] public candidates;

    /// @notice Address of the contract owner
    address owner;

    /// @notice Mapping to track if an address has voted
    mapping(address => bool) public voters;

    /// @notice Timestamp when voting starts
    uint256 public votingStart;

    /// @notice Timestamp when voting ends
    uint256 public votingEnd;

    /// @notice Constructor to initialize the voting contract
    /// @param _candidateNames Array of candidate names
    /// @param _durationInMinutes Duration of the voting period in minutes
    constructor(string[] memory _candidateNames, uint256 _durationInMinutes) {
        for (uint256 i = 0; i < _candidateNames.length; i++) {
            candidates.push(Candidate({
                name: _candidateNames[i],
                voteCount: 0
            }));
        }
        owner = msg.sender;
        votingStart = block.timestamp;
        votingEnd = block.timestamp + (_durationInMinutes * 1 minutes);
    }

    /// @notice Modifier to restrict function access to the contract owner
    modifier onlyOwner {
        require(msg.sender == owner);
        _;
    }

    /// @notice Adds a new candidate to the election
    /// @param _name Name of the new candidate
    function addCandidate(string memory _name) public onlyOwner {
        candidates.push(Candidate({
                name: _name,
                voteCount: 0
        }));
    }

    /// @notice Allows a voter to cast their vote
    /// @param _candidateIndex Index of the candidate in the candidates array
    function vote(uint256 _candidateIndex) public {
        require(!voters[msg.sender], "You have already voted.");
        require(_candidateIndex < candidates.length, "Invalid candidate index.");

        candidates[_candidateIndex].voteCount++;
        voters[msg.sender] = true;
    }

    /// @notice Retrieves all candidates and their vote counts
    /// @return An array of Candidate structs
    function getAllVotesOfCandidates() public view returns (Candidate[] memory){
        return candidates;
    }

    /// @notice Checks if voting is currently active
    /// @return Boolean indicating if voting is active
    function getVotingStatus() public view returns (bool) {
        return (block.timestamp >= votingStart && block.timestamp < votingEnd);
    }

    /// @notice Calculates the remaining time in the voting period
    /// @return The remaining time in seconds
    function getRemainingTime() public view returns (uint256) {
        require(block.timestamp >= votingStart, "Voting has not started yet.");
        if (block.timestamp >= votingEnd) {
            return 0;
        }
        return votingEnd - block.timestamp;
    }
}
This contract provides a basic framework for a decentralized voting system where users can cast votes for candidates securely and transparently. It ensures that each user can vote only once by tracking voter addresses, and it maintains a record of all votes on the blockchain. The contract manages the voting period by specifying start and end times, enforcing voting rules, and providing functions to retrieve voting results and status.
This image illustrates the concept of the smart contract:
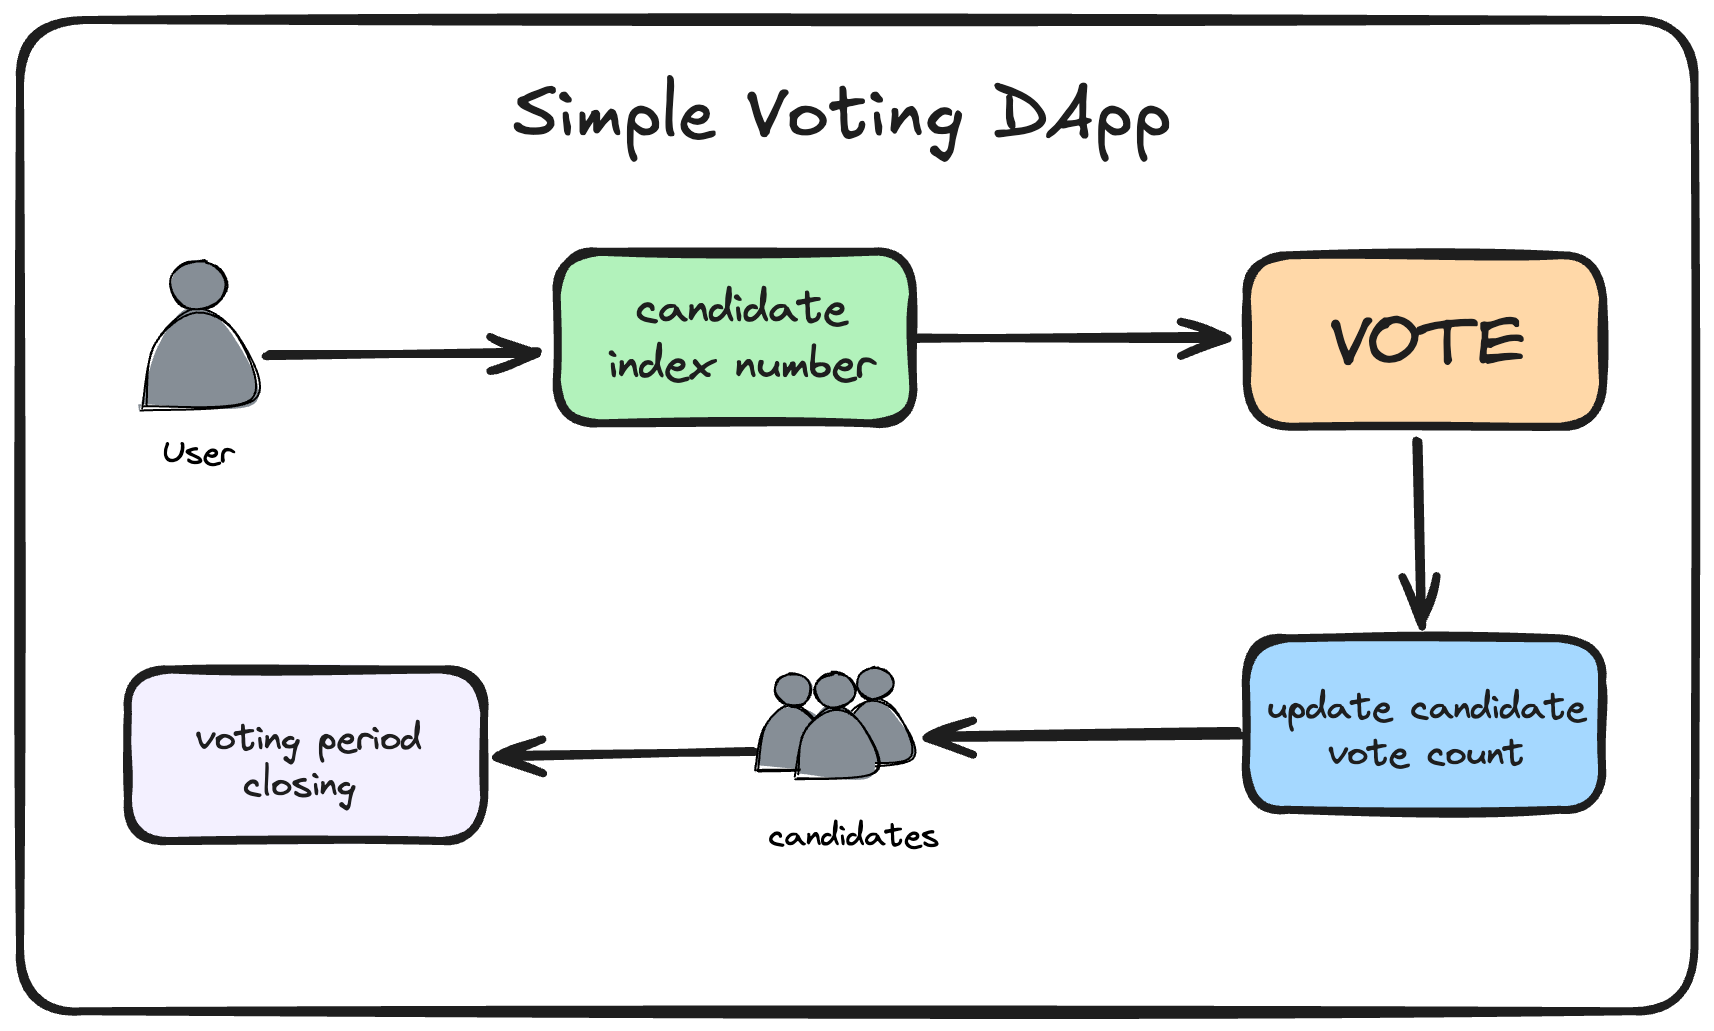
1. Contract initialization and candidate setup
- The
Votingcontract initializes with an array of candidate names provided during deployment. - Each candidate is represented by a
Candidatestruct containing anameand avoteCount. - The constructor sets the
votingStarttime to the current block timestamp. - It calculates the
votingEndtime by adding the specified duration in minutes to the start time.
2. Access control and owner functions
- The contract stores the deployer's address as
owner. - An
onlyOwnermodifier restricts certain functions to the contract owner. - The
addCandidatefunction allows the owner to add new candidates after hardhat deployment. This ensures only authorized users can modify the list of candidates.
3. Voting mechanism
- The
votefunction lets users cast a vote by specifying a candidate's index. - A
votersmapping tracks whether an address has already voted. - The function checks if the voter hasn't voted before and if the candidate index is valid.
- Upon a valid vote, it increments the candidate's
voteCountand marks the voter as having voted.
4. Utility functions and voting status
getAllVotesOfCandidatesreturns all candidates and their current vote counts.getVotingStatusreturnstrueif voting is active based on the current time.getRemainingTimecalculates and returns how much time is left in the voting period.- These functions provide users with real-time information about the election.
This smart contract facilitates a decentralized voting system where users can vote for candidates securely, with all votes and results recorded on the blockchain.
6. Deploy the contract
In the ignition folder, create a file named Voting.ts to deploy your contract.
Add the following code:
import { buildModule } from "@nomicfoundation/hardhat-ignition/modules";

const VotingModule = buildModule("VotingModule", (m) => {
  // Default values
  const DEFAULT_CANDIDATES = ["Candidate 1", "Candidate 2", "Candidate 3"];
  const DEFAULT_DURATION_MINUTES = 60; // 1 hour

  // Get parameters with default values
  const candidateNames = m.getParameter("candidateNames", DEFAULT_CANDIDATES);
  const durationInMinutes = m.getParameter(
    "durationInMinutes",
    DEFAULT_DURATION_MINUTES
  );

  // Deploy the Voting contract
  const voting = m.contract("Voting", [
    candidateNames,
    durationInMinutes,
  ]);

  return { voting };
});

export default VotingModule;
This deployment script uses Hardhat Ignition to manage the deployment of your Voting contract.
It sets default candidates and a default voting duration but also allows these values to be customized
through parameters if needed.
Compile the contract by running the following command in the blockchain directory:
npx hardhat compile
Deploy the contract on Linea Sepolia by running the following command from the blockchain directory:
npx hardhat ignition deploy ignition/modules/Voting.ts --network linea-testnet
This command tells Hardhat to use Ignition to deploy the Voting module to the linea-testnet
network.
Alternatively, you can add a deployment script to your package.json to simplify the process.
Add the following line under the "scripts" section:
"scripts": {
  "deploy:testnet": "npx hardhat ignition deploy ignition/modules/Voting.ts --network linea-testnet"
}
Then, you can deploy the contract by running:
pnpm run deploy:testnet
After deployment, you'll receive the contract address. Save this address, as you'll need it when integrating with the frontend.
7. Configure Wagmi and MetaMask SDK
Navigate to the site directory in your monorepo:
cd packages/site
Since you've already set up the frontend using the Create Web3 Template CLI, you can proceed to integrate the smart contract.
Create a wagmi.config.ts file in the src directory with the following content:
import { http, createConfig } from "wagmi";
import { lineaSepolia } from "wagmi/chains";
import { metaMask } from "wagmi/connectors";

export const config = createConfig({
  chains: [lineaSepolia],
  connectors: [metaMask()],
  transports: {
    [lineaSepolia.id]: http(),
  },
});
This configuration sets up the connection to the Linea testnet and enables wallet integration using MetaMask.
8. Add contract constants
In the src directory, create a file named constants.ts and add the following:
export const CONTRACT_ADDRESS = 'your_deployed_contract_address_here';

export const ABI = [
  // Paste the ABI of your Voting contract here
];
- Replace
'your_deployed_contract_address_here'with the contract address you obtained after deployment. - Find the ABI in the
artifactsfolder generated by Hardhat after compilation.
9. Create app/page.tsx
Update app/page.tsx with the following code.
These sections explain the key aspects in more detail:
React and hooks usage
"use client";

import { useState } from "react";
import { useAccount, useWalletClient } from "wagmi";
import { ConnectButton } from "@consensys/connect-button";
import { Button } from "@/components/ui/button";
import { Input } from "@/components/ui/input";
import { useReadContract, useWriteContract } from "wagmi";
import { Card, CardContent } from "@/components/ui/card";
import { contractAddress, contractAbi } from "../../constants";
This Next.js client-side component uses:
- React's
useStatefor state management. - Wagmi hooks (
useAccount,useWalletClient,useReadContract,useWriteContract) for wallet and contract interactions. - UI elements (
Button,Input,Card,CardContent) from shadcn. - A
ConnectButtonfor MetaMask connection. contractAddressandcontractAbifrom constants for contract use.
Interface definition
interface Candidate {
  index: number;
  name: string;
  voteCount: number;
}
- Defines a TypeScript
interfacenamedCandidate. - Specifies the structure for candidate objects:
index: The candidate's index number.name: The candidate's name.voteCount: The number of votes the candidate has received.
Component initialization
export default function Home() {
  const { address } = useAccount();
  const { data: walletClient } = useWalletClient();
  const [number, setNumber] = useState("");
- Function component: Defines the
Homecomponent as the default export. - Wallet information:
address: The user's wallet address obtained fromuseAccount.walletClient: The wallet client used for signing transactions.
- State management:
number: A state variable to store the candidate index input by the user for voting.setNumber: Function to update thenumberstate.
Smart contract interaction - reading data
const { writeContract } = useWriteContract();

const { data: votingStatus } = useReadContract({
  address: contractAddress,
  abi: contractAbi,
  functionName: "getVotingStatus",
}) as { data: boolean };

const { data: canVote } = useReadContract({
  address: contractAddress,
  abi: contractAbi,
  functionName: "voters",
  args: [address],
});

const { data: remainingTime } = useReadContract({
  address: contractAddress,
  abi: contractAbi,
  functionName: "getRemainingTime",
}) as { data: bigint };

const { data: candidates } = useReadContract({
  address: contractAddress,
  abi: contractAbi,
  functionName: "getAllVotesOfCandidates",
}) as { data: Candidate[] };
- Writing to contract:
writeContractis prepared for sending transactions to the smart contract.
- Reading contract data:
votingStatus: Retrieves whether the voting is currently active.canVote: Checks if the current user has already voted.remainingTime: Gets the time remaining before the voting period ends.candidates: Fetches the list of all candidates and their vote counts.
- Type assertions:
- Uses TypeScript
assyntax to specify the expected data type for better type safety.
- Uses TypeScript
Early return for missing data
if (!candidates) return;
- Checks if the
candidatesdata is available. - If
candidatesisundefinedornull, the component returns early to prevent rendering errors.
Voting functionality
async function vote() {
  if (!walletClient || !address || number === "") {
    console.error("Missing required data for voting");
    return;
  }
  if (
    isNaN(Number(number)) ||
    Number(number) < 0 ||
    Number(number) >= candidates.length
  ) {
    console.error("Invalid candidate index");
    return;
  }
  if (!votingStatus) {
    console.error("Voting is not currently active");
    return;
  }
  try {
    console.log("Attempting to vote for candidate index:", number);
    writeContract({
      address: contractAddress,
      abi: contractAbi,
      functionName: "vote",
      args: [BigInt(number)],
      account: address,
    });
  } catch (error) {
    console.error("Detailed error in vote function:", error);
  }
}
- Input validation:
- Checks if the wallet client, user address, and candidate number are available.
- Validates that the candidate index is a valid number within the range of available candidates.
- Ensures that voting is currently active.
- Voting process:
- Uses
writeContractto call thevotefunction on the smart contract. - Passes the candidate index as a
BigInt. - Uses the user's wallet address as the account.
- Uses
- Error handling:
- Wraps the contract interaction in a
try-catchblock to handle any errors that occur during the voting process. - Logs detailed error information to the console.
- Wraps the contract interaction in a
UI rendering
return (
  <main className="container mx-auto p-4">
    <h1 className="text-2xl font-bold mb-4">
      Decentralized Voting Application
    </h1>
    <ConnectButton />

    {votingStatus ? (
      address ? (
        <Card className="mt-4">
          <CardContent>
            <p>Connected Account: {address}</p>
            <p>Remaining Time: {Number(remainingTime)} seconds</p>
            {!canVote ? (
              <div className="mt-4">
                <Input
                  type="number"
                  placeholder="Enter Candidate Index"
                  value={number}
                  onChange={(e) => setNumber(e.target.value)}
                  className="mb-2"
                />
                <Button onClick={vote}>Vote</Button>
              </div>
            ) : (
              <p>You have already voted</p>
            )}
            <div className="mt-4">
              <h2 className="text-xl font-semibold mb-2">Candidates</h2>
              <ul>
                {candidates.map((candidate) => (
                  <li key={candidate.index}>
                    {candidates.indexOf(candidate)}: {candidate.name} -{" "}
                    {Number(candidate.voteCount)} votes
                  </li>
                ))}
              </ul>
            </div>
          </CardContent>
        </Card>
      ) : (
        <p>Please connect your wallet to vote</p>
      )
    ) : (
      <p>Voting has finished</p>
    )}
  </main>
);
The component features a styled main container with a header and a ConnectButton for MetaMask integration.
It conditionally renders content based on votingStatus and user connection: if voting is active and
the user is connected, it displays their address, remaining time, and voting options; if they've already
voted, it notifies them and lists all candidates.
If the user isn't connected, it prompts them to connect their wallet.
When voting has ended, it shows "Voting has finished."
Error handling and validation
- Input validation:
- Ensures the candidate index entered is a valid number within the acceptable range.
- Error messages:
- Uses
console.errorto log meaningful error messages for debugging purposes. - User feedback:
- Provides real-time feedback to the user based on their actions and the application's state.
View the full code.
10. Start your dapp
npm run dev
Your Next.js application with shadcn/ui is now running at http://localhost:3000.
You now have a decentralized voting dapp where users can vote for the candidates by using their index number. These votes are secure, transparent and recorded on the Linea blockchain.
Next steps
-
Build on this project by adding voter registration or vote delegation, enhancing security measures, or improving the user interface for better accessibility.
-
See the full example dapp on GitHub.