Build your first dapp on Linea
This tutorial will walk you through creating a simple Linea dapp that allows users to stake tokens in a contract.
As Linea uses the London version of Ethereum, a small number of recent opcodes are not available.
Prerequisites
- Install Node.js and a package manager (this tutorial uses pnpm).
- Install the MetaMask wallet and fund it with Linea Sepolia ETH.
Steps
1. Create the staking contract
You'll create a simple staking contract. Use Remix, an online tool that speeds up Solidity development. For a complete development environment, you can also use Foundry or Hardhat.
You can follow the steps directly on the images included in this tutorial if you don't know how to use Remix.
-
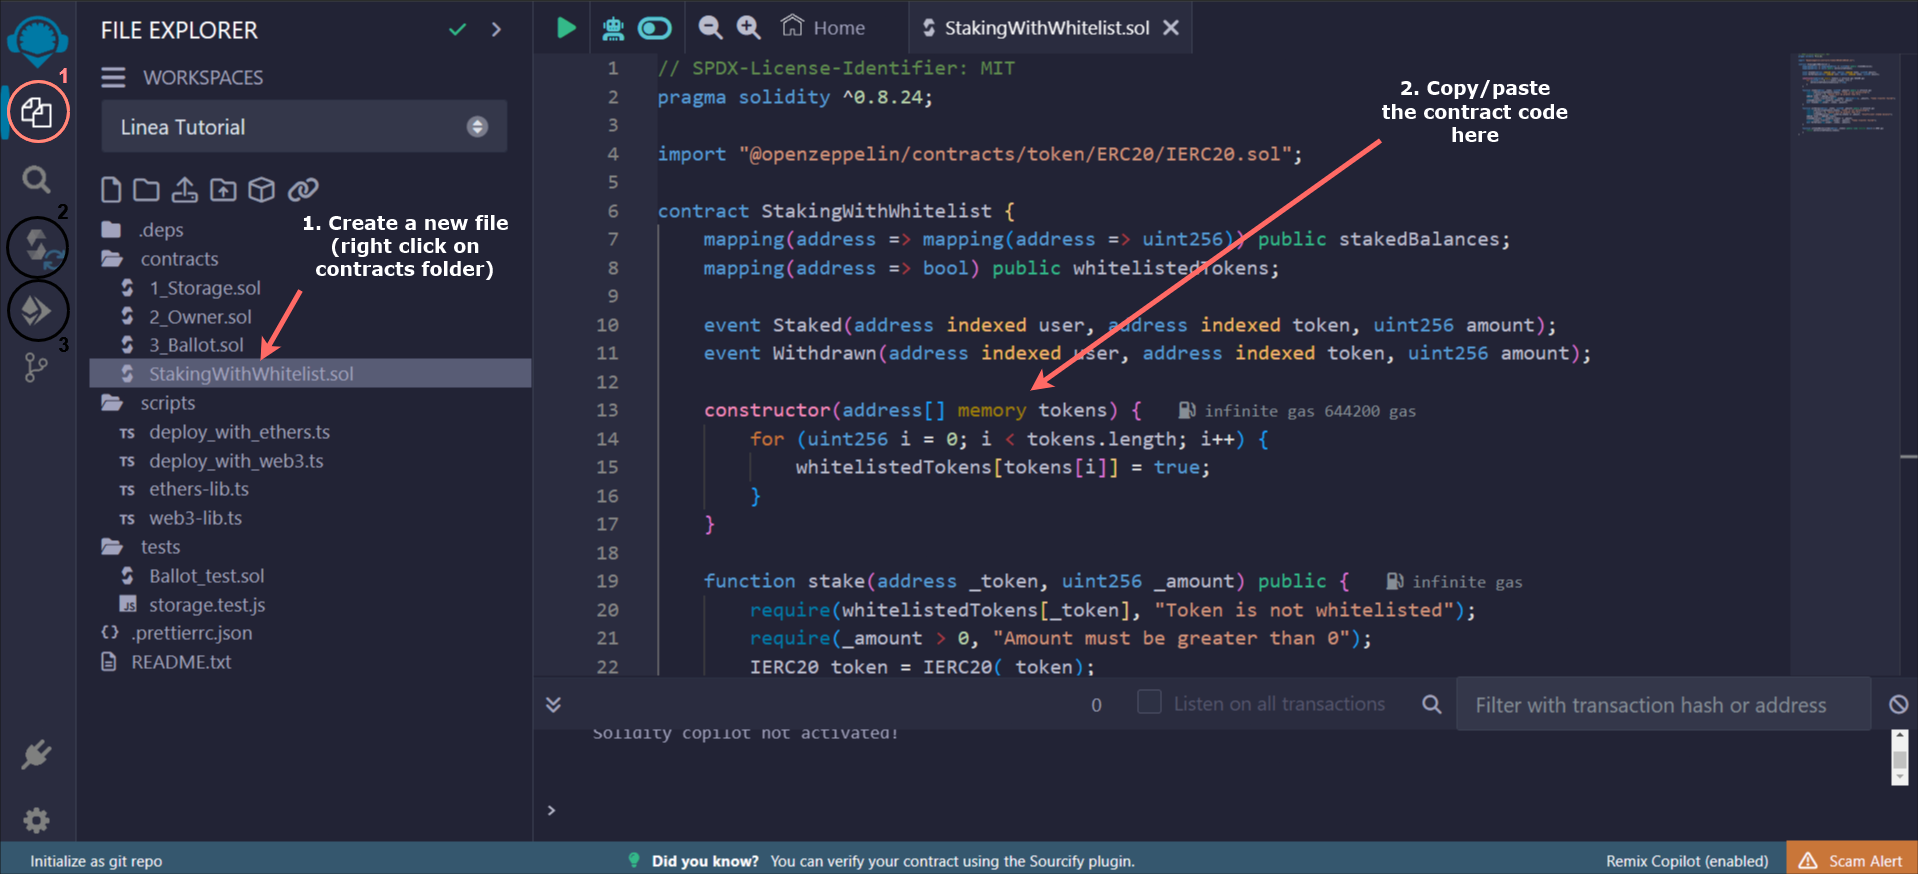
Go to the Remix IDE and create a new file in the contracts folder.
-
Copy and paste the following code:
// SPDX-License-Identifier: MITpragma solidity ^0.8.24;import "@openzeppelin/contracts/token/ERC20/IERC20.sol";contract StakingWithAllowlist {mapping(address => mapping(address => uint256)) public stakedBalances;mapping(address => bool) public allowlistedTokens;event Staked(address indexed user, address indexed token, uint256 amount);event Withdrawn(address indexed user, address indexed token, uint256 amount);constructor(address[] memory tokens) {for (uint256 i = 0; i < tokens.length; i++) {allowlistedTokens[tokens[i]] = true;}}function stake(address _token, uint256 _amount) public {require(allowlistedTokens[_token], "Token is not in the allowlist");require(_amount > 0, "Amount must be greater than 0");IERC20 token = IERC20(_token);require(token.transferFrom(msg.sender, address(this), _amount), "Token transfer failed");stakedBalances[msg.sender][_token] += _amount;emit Staked(msg.sender, _token, _amount);}function withdraw(address _token, uint256 _amount) public {require(allowlistedTokens[_token], "Token is not in the allowlist");require(_amount > 0, "Amount must be greater than 0");require(stakedBalances[msg.sender][_token] >= _amount, "Insufficient staked balance");IERC20 token = IERC20(_token);stakedBalances[msg.sender][_token] -= _amount;require(token.transfer(msg.sender, _amount), "Token transfer failed");emit Withdrawn(msg.sender, _token, _amount);}function isTokenAllowlisted(address _token) public view returns (bool) {return allowlistedTokens[_token];}}This is a simplified version of a staking contract with an allowlist. It allows you to stake any ERC-20, and contains the two basic functions
stakeandwithdraw. The allowlist is set up when the contract is deployed; there are other versions where the allowlist can be modified, usually by the owner.
2. Compile the contract
-
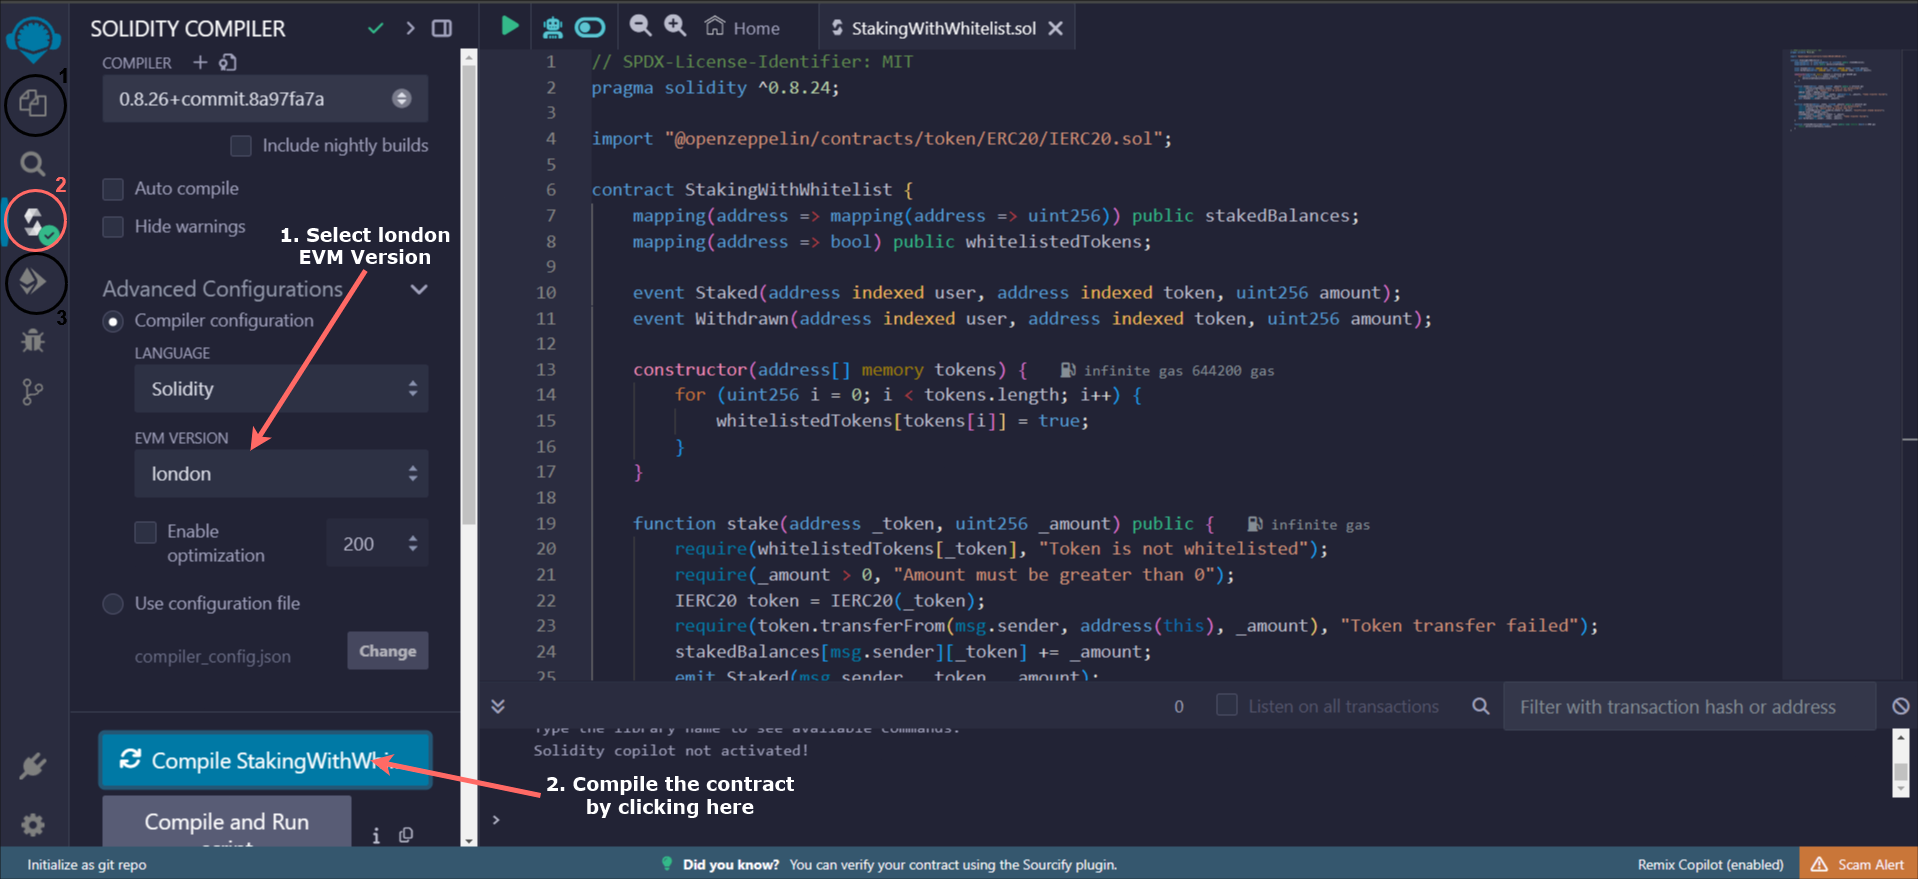
Go to the Solidity Compiler tab. Select the London version in the EVM Version list under Advanced Configurations (to avoid any compatibility issues).
-
Select Compile.
After compiling the code, you'll see this below the compile button:
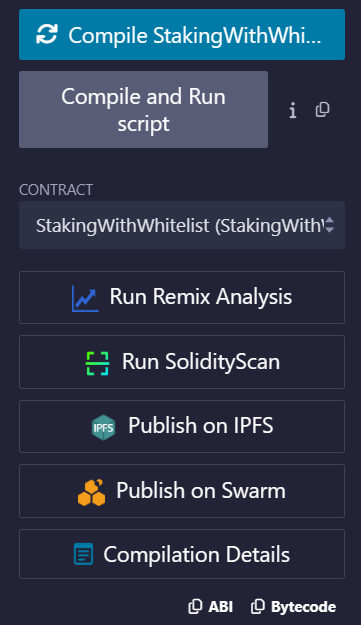
Copy the ABI using the button at the bottom. Save it in a JSON file, as you'll need it later.
3. Deploy the contract
-
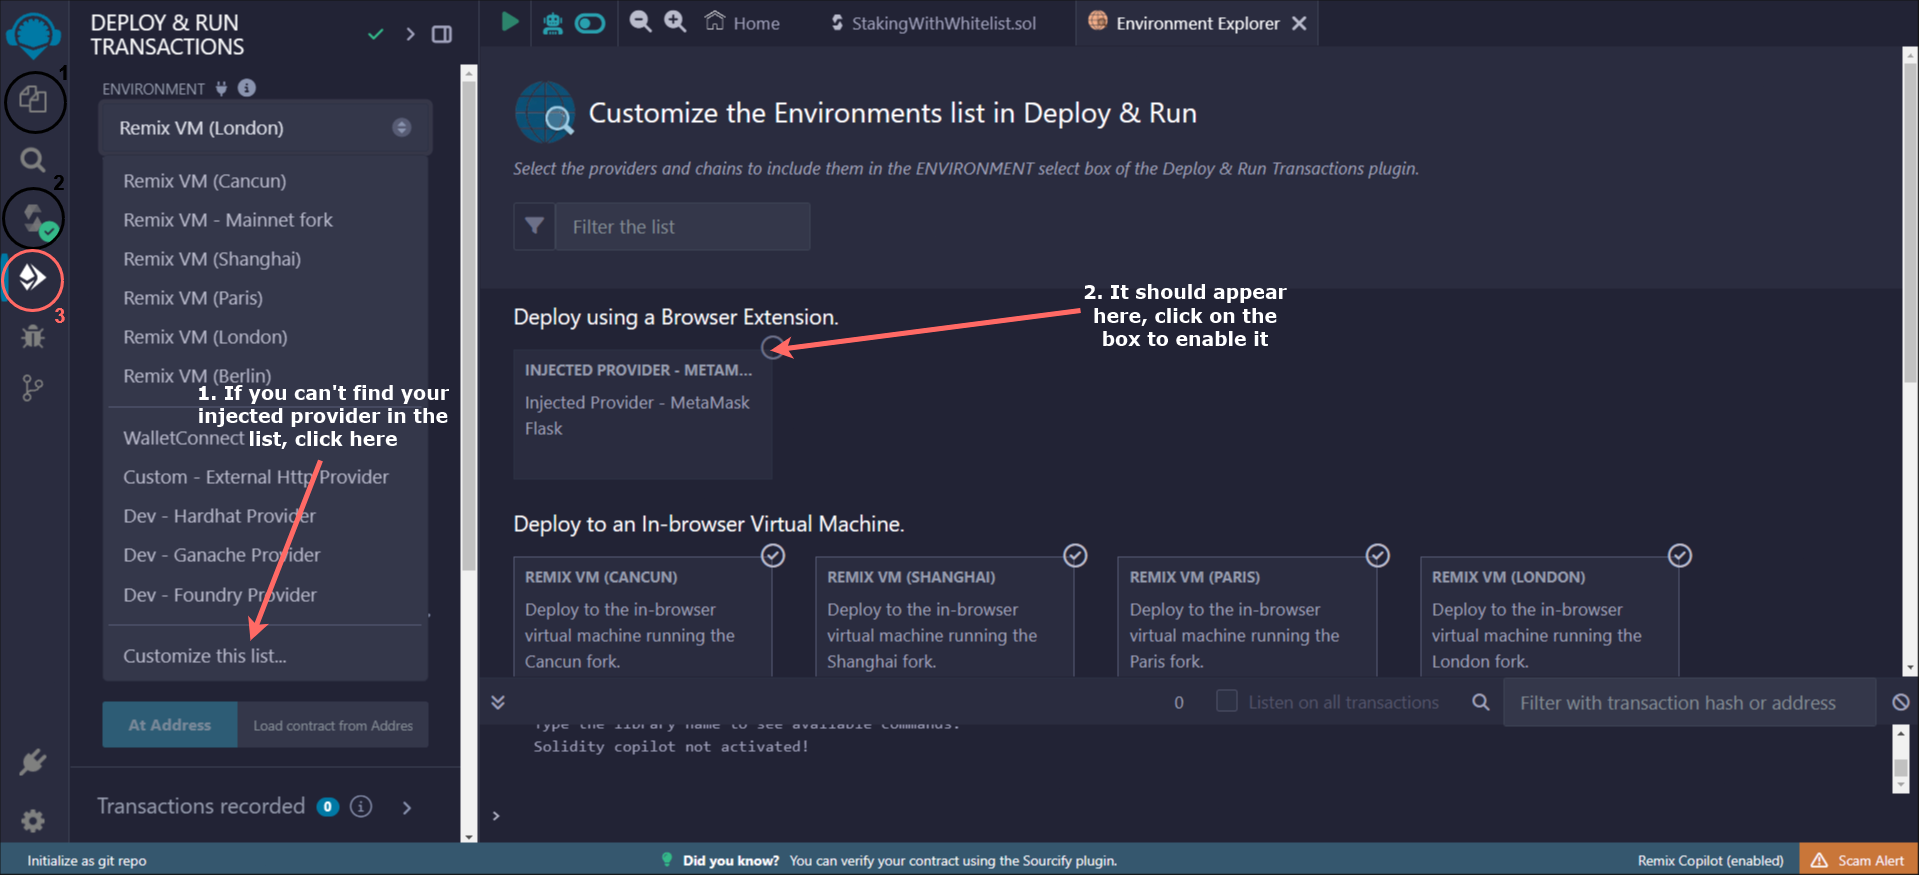
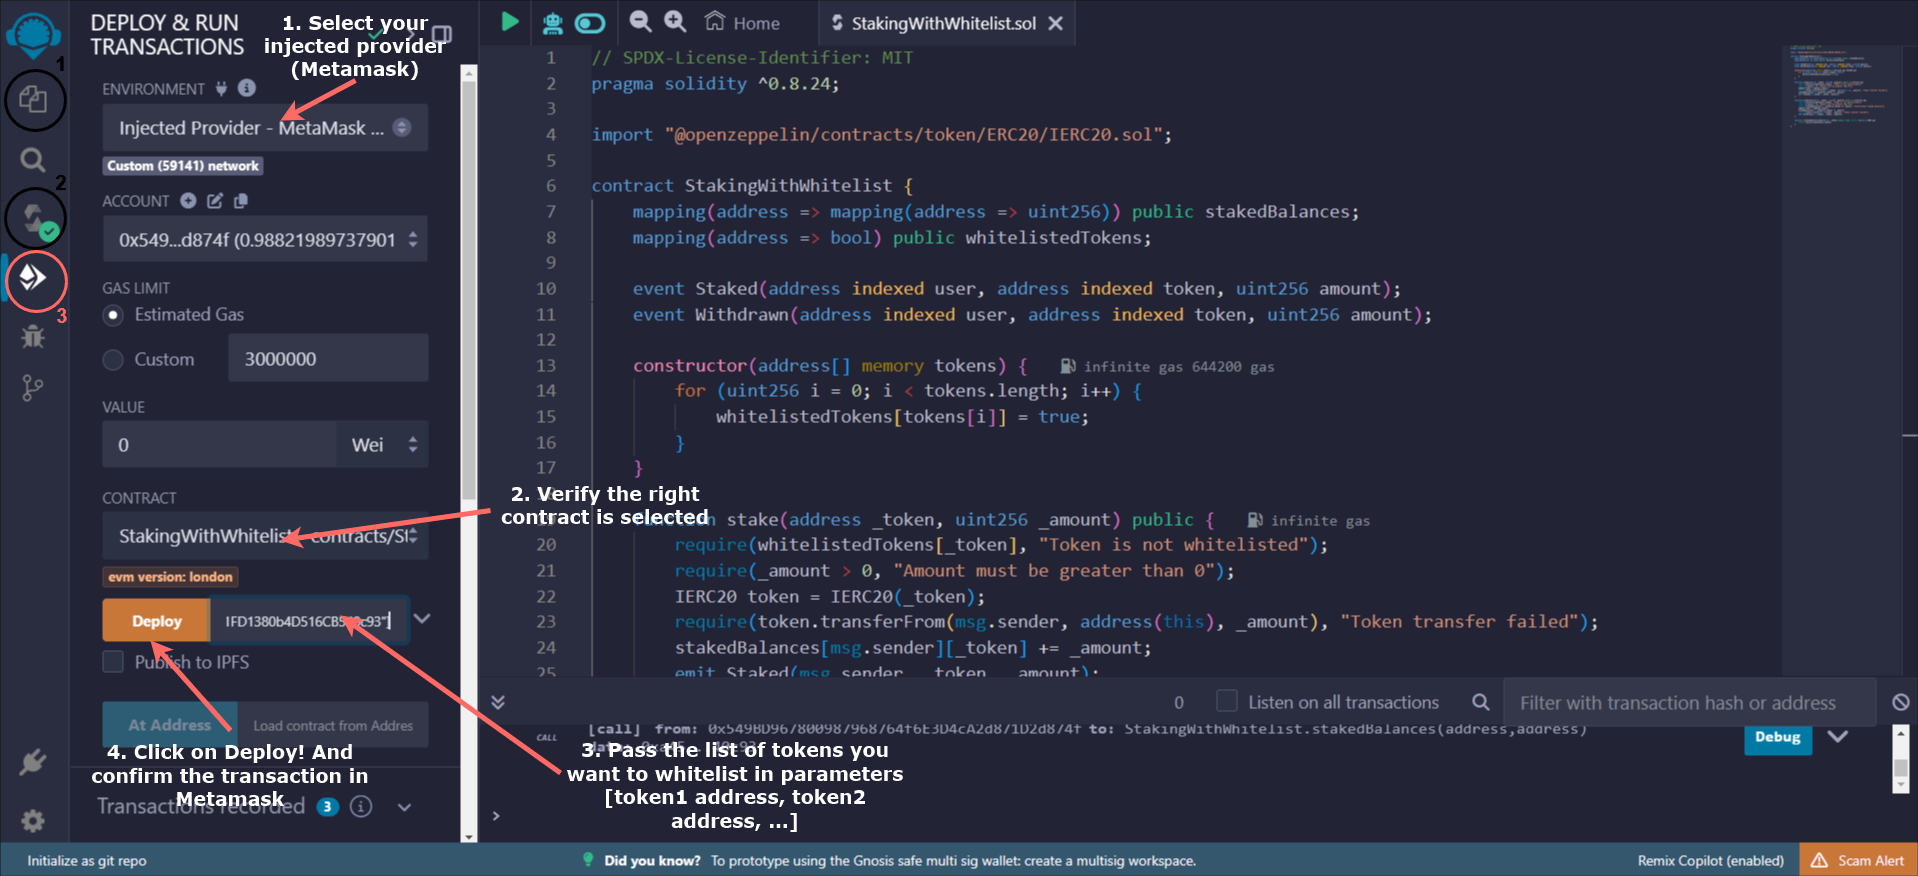
Go to the Deploy tab. Select your injected provider (MetaMask) as the environment. You'll get a connection request to accept.
What should I do if my injected provider doesn't appear?
If your injected provider does not appear by default:
- Select Customize this list at the bottom of the environment list. A page will open in Remix.
- You should see your injected provider here. Select the box at the top right and it should appear at the top of the list.
-
Check that the contract is the one you want to deploy.
-
Enter the list of tokens you want to allowlist. For this tutorial, three ERC-20 contracts have been deployed for your use (you can copy and paste directly into the field):
["0x46871676658472B99720F2a368CDa6430c1647b9","0xB7D70343639aF53a02f6ea7d9cde240fc72de6Dd","0x66a6F52C2100FB82EE21FD1380b4D516CB540c93"]These ERC-20 contracts are verified so you can interact with them directly on Lineascan to mint some tokens. Put your address and the number of tokens you want (don't forget that if you want 1 token you have to put 1e18, which is 100000000000000000).
-
Select Deploy and confirm the transaction in MetaMask. You'll see success logs in the console at the bottom right. You can copy the contract address by going to recorded transactions (under the deploy button), but you can also find it by searching for your address on the Sepolia Linea explorer.
4. Set up the frontend with RainbowKit
Use RainbowKit to set up a new Next.js app built on top of wagmi. These libraries simplify how to handle reading chain state, wallet connections, sending transactions, listening for events and state changes, and more.
-
Run
pnpm create @rainbow-me/rainbowkit@latestand choose a project name. -
Run
cd yourprojectnameand open the project in your IDE (runcode .to open it in VS Code). -
Configure the chain to Linea Sepolia by modifying the
src/wagmi.tsfile:import { getDefaultConfig } from '@rainbow-me/rainbowkit';import { lineaSepolia } from 'wagmi/chains';export const config = getDefaultConfig({appName: 'Linea Token Staking App',projectId: 'YOUR_PROJECT_ID',chains: [lineaSepolia],ssr: true,});
5. Configure and style the frontend
Configure and style the project using shadcn with Tailwind CSS:
pnpm install -D tailwindcss postcss autoprefixer lucide-react
npx tailwindcss init -p
npx shadcn-ui@latest init
Press enter each time to choose the default parameters (or use your preferred configuration).
Depending on your system, you might have some differences, so use the following to ensure you have the configuration expected by this tutorial:
-
You should have an
appfolder, with aglobal.cssfile inside. You can move it tosrc/pages/globals.cssand edit the import at the top of_app.tsx:import './globals.css'; -
shadcn works by manually adding each component with the
pnpm dlx shadcn-ui@latest add <component>, so be sure to do it for each import. Run this command to add all the components you'll use:pnpm dlx shadcn-ui@latest add tabs button card input label popover command -
You also have a folder containing two folders
componentsandlib. You can move them undersrc—>src/componentsandsrc/lib. -
Verify that in the
tsconfig.jsonfile that you have this undercompilerOptions:"compilerOptions": {...,"paths": {"@/*": ["./src/*"]}} -
You can delete the empty folders (these might vary depending on your system, but you should have an empty
appfolder at least). Also, if you have bothtailwind.config.jsandtailwind.config.ts, remove thetailwind.config.jsfile.
The configuration is done. You should have a project structure like this:
src
├── components
│   └── ui
│       ├── button.tsx
│       ├── card.tsx
│       ├── command.tsx
│       ├── dialog.tsx
│       ├── input.tsx
│       ├── label.tsx
│       └── popover.tsx
├── lib
│   └── utils.ts
├── pages
│   ├── _app.tsx
│   ├── globals.css
│   └── index.tsx
└── wagmi.ts
6. Handle the wallet connection
You're ready to integrate your contracts and build the main interface.
You'll do that in the src/pages/index.tsx file, which will be your main page.
You can remove the content in this file and start from scratch.
Define an empty page with a connect button and some useful debug information.
Use the ConnectButton from RainbowKit to handle the wallet connection, and the useAccount hook from
Wagmi to get the connected account information.
import type { NextPage } from 'next';
import { ConnectButton } from '@rainbow-me/rainbowkit';
import { useAccount } from 'wagmi';

const Home: NextPage = () => {
  const account = useAccount();

  return (
    <div className="bg-background w-full h-screen flex items-center justify-center">
      {/* Top right corner: Wallet information */}
      <div className="absolute top-0 right-0 p-4">
        <ConnectButton />
      </div>

      {/* Bottom left corner: Debug information */}
      <div className="absolute text-xs text-gray-500 bottom-0 left-0 p-4">
        status: {account.status}
        <br />
        address: {JSON.stringify(account.address)}
        <br />
        chainId: {account.chainId}
      </div>
    </div>
  );
};

export default Home;
Run pnpm dev and go to http://localhost:3000/ in your browser.
Try to connect your wallet; RainbowKit should automatically ask you to switch to Linea Sepolia.
Verify that the chainId is 59141 in the debug information corner.
7. Add the staking interface
Copy and paste this code for a simple staking card design at the top of index.tsx:
import { useEffect, useState } from "react";
import { cn } from "@/lib/utils";
import { Button } from "@/components/ui/button";
import { Card, CardContent, CardHeader, CardTitle } from "@/components/ui/card";
import { Label } from "@/components/ui/label";
import { Input } from "@/components/ui/input";
import {
  Command,
  CommandEmpty,
  CommandGroup,
  CommandInput,
  CommandItem,
  CommandList,
} from "@/components/ui/command";
import {
  Popover,
  PopoverContent,
  PopoverTrigger,
} from "@/components/ui/popover";
import { Tabs, TabsContent, TabsList, TabsTrigger } from "@/components/ui/tabs";
import { Check, ChevronsUpDown } from "lucide-react";

const tokens: { value: `0x${string}`; label: string }[] = [
  {
    value: "0x46871676658472B99720F2a368CDa6430c1647b9",
    label: "COFFEE",
  },
  {
    value: "0xB7D70343639aF53a02f6ea7d9cde240fc72de6Dd",
    label: "TEA",
  },
  {
    value: "0x66a6F52C2100FB82EE21FD1380b4D516CB540c93",
    label: "WATER",
  },
];

const TokensCombobox = ({ value, setValue, disabled }: any) => {
  const [open, setOpen] = useState(false);
  return (
    <Popover open={open} onOpenChange={setOpen}>
      <PopoverTrigger asChild>
        <Button
          variant="outline"
          role="combobox"
          aria-expanded={open}
          className="w-full justify-between"
          disabled={disabled}
        >
          {value
            ? tokens.find((token) => token.value === value)?.label
            : "Select token..."}
          <ChevronsUpDown className="ml-2 h-4 w-4 shrink-0 opacity-50" />
        </Button>
      </PopoverTrigger>
      <PopoverContent className="w-full p-0">
        <Command>
          <CommandInput placeholder="Search by address..." />
          <CommandList>
            <CommandEmpty>No token found.</CommandEmpty>
            <CommandGroup>
              {tokens.map((token) => (
                <CommandItem
                  key={token.value}
                  value={token.value}
                  onSelect={(currentValue) => {
                    setValue(currentValue === value ? "" : currentValue);
                    setOpen(false);
                  }}
                >
                  <Check
                    className={cn(
                      "mr-2 h-4 w-4",
                      value === token.value ? "opacity-100" : "opacity-0"
                    )}
                  />
                  {token.label}
                </CommandItem>
              ))}
            </CommandGroup>
          </CommandList>
        </Command>
      </PopoverContent>
    </Popover>
  );
};

const StakingCard = ({ account, disabled }: any) => {
  const [menuTab, setMenuTab] = useState<"stake" | "unstake">("stake");
  const [token, setToken] = useState<`0x${string}`>(tokens[0].value);
  const [amountToStake, setAmountToStake] = useState<number>(0);
  const [amountToUnstake, setAmountToUnstake] = useState<number>(0);
  const [amountStakable, setAmountStakable] = useState<number>(0);
  const [amountStaked, setAmountStaked] = useState<number>(0);

  const mockFetchAmountStakableForToken = (tokenAddress: string) => 10;
  const mockFetchAmountStakedForToken = (tokenAddress: string) => 10;
  useEffect(() => {
    const stakable = mockFetchAmountStakableForToken(token);
    const staked = mockFetchAmountStakedForToken(token);
    setAmountStakable(stakable);
    setAmountToStake(stakable);
    setAmountStaked(staked);
    setAmountToUnstake(staked);
  }, [token]);

  return (
    <Card className="w-full max-w-sm relative">
      {disabled && (
        <div className="z-50 backdrop-blur-[3px] rounded-lg absolute inset-0 flex items-center justify-center">
          <p className="text-md text-gray-500">
            Please connect your wallet first
          </p>
        </div>
      )}

      <div className="absolute text-xs text-gray-500 top-0 right-0 p-4">
        Available to stake: {amountStakable}
        <br />
        Amount staked: {amountStaked}
      </div>

      <CardHeader>
        <CardTitle className="text-2xl">Linea Staking</CardTitle>
      </CardHeader>
      <CardContent className="grid gap-4">
        <div className="grid gap-2">
          <Label htmlFor="targetToken">Token</Label>
          <TokensCombobox
            id="targetToken"
            value={token}
            setValue={setToken}
            disabled={disabled}
          />
        </div>

        <Tabs defaultValue="stake" value={menuTab}>
          <TabsList
            className="grid w-full grid-cols-2"
            hidden={amountStakable === 0 || amountStaked === 0}
          >
            <TabsTrigger
              value="stake"
              disabled={amountStakable === 0}
              onClick={() => setMenuTab("stake")}
            >
              Stake
            </TabsTrigger>
            <TabsTrigger
              value="unstake"
              disabled={amountStaked === 0}
              onClick={() => setMenuTab("unstake")}
            >
              Unstake/Withdraw
            </TabsTrigger>
          </TabsList>

          <TabsContent value="stake">
            <div className="grid gap-2">
              <div className="flex w-full max-w-sm items-center space-x-2">
                <Input
                  id="amountToStake"
                  value={amountToStake}
                  onChange={(e) => {
                    const value = Math.min(
                      Number(e.target.value),
                      amountStakable
                    );
                    setAmountToStake(value);
                  }}
                  disabled={disabled || amountStakable === 0}
                  type="number"
                />
                <Button
                  type="submit"
                  variant="secondary"
                  onClick={() => setAmountToStake(amountStakable)}
                >
                  Max
                </Button>
              </div>
            </div>
            <Button
              className="w-full mt-4"
              onClick={() => {}}
              disabled={disabled || amountStakable === 0}
            >
              Stake
            </Button>
          </TabsContent>

          <TabsContent value="unstake">
            <div className="grid gap-2">
              <div className="flex w-full max-w-sm items-center space-x-2">
                <Input
                  id="amountToUnstake"
                  value={amountToUnstake}
                  onChange={(e) => {
                    const value = Math.min(
                      Number(e.target.value),
                      amountStaked
                    );
                    setAmountToUnstake(value);
                  }}
                  disabled={disabled || amountStaked === 0}
                  type="number"
                />
                <Button
                  type="submit"
                  variant="secondary"
                  onClick={() => setAmountToUnstake(amountStaked)}
                >
                  Max
                </Button>
              </div>
            </div>
            <Button
              className="w-full mt-4"
              onClick={() => {}}
              disabled={disabled || amountStaked === 0}
            >
              Unstake
            </Button>
          </TabsContent>
        </Tabs>
      </CardContent>
    </Card>
  );
};
This tutorial won't explain this code, since it's mostly React state management.
You define the list of tokens as a constant to simplify.
The StakingCard component handles all the token selection and inputs as well.
Add it to the page (in React, this means putting the following in return( ... )):
{/* Main content */}
<StakingCard
  account={account}
  disabled={account.status !== "connected"}
/>
8. Integrate the contract
Until now, nothing is connected to the blockchain.
Note that the mockFetchAmountStakableForToken and mockFetchAmountStakedForToken functions just
return a constant.
You'll use the useReadContracts hook for this purpose.
You'll also use useWatchBlockNumber to reread the state on each new block.
Before doing that, create an abi.json file in src/pages and paste the ABI from the smart contract
(saved from step 2).
Define the contract address and ABI:
import { useAccount, useReadContracts, useWatchBlockNumber } from "wagmi";
import { erc20Abi } from 'viem'
import CONTRACT_ABI from "./abi.json";
const CONTRACT_ADDRESS = "0xe5fac868B1d0E4d119A09cC7253E2D7a3cb250da";
Remove the previous mock part with this new one:
const mockFetchAmountStakableForToken = (tokenAddress: string) => 10;
const mockFetchAmountStakedForToken = (tokenAddress: string) => 10;
useEffect(() => {
  const stakable = mockFetchAmountStakableForToken(token);
  const staked = mockFetchAmountStakedForToken(token);
  setAmountStakable(stakable);
  setAmountToStake(stakable);
  setAmountStaked(staked);
  setAmountToUnstake(staked);
}, [token]);

const [blockNumber, setBlockNumber] = useState<bigint>(BigInt(0));
  useWatchBlockNumber({
    onBlockNumber(blockNumber) {
      setBlockNumber(blockNumber);
    },
  })

const { data, isSuccess, isLoading } = useReadContracts({
	allowFailure: false,
	blockNumber,
	contracts: [
	  // Token decimals
	  {
	    address: token,
	    abi: erc20Abi,
	    functionName: "decimals",
	  },
	  // Stakable
	  {
	    address: token,
	    abi: erc20Abi,
	    functionName: "balanceOf",
	    args: [account.address],
	  },
	  // Staked
	  {
	    address: CONTRACT_ADDRESS,
	    abi: CONTRACT_ABI,
	    functionName: "stakedBalances",
      args: [account.address, token],
	  },
		//Allowance
    {
      address: token,
      abi: erc20Abi,
      functionName: "allowance",
      args: [account.address, CONTRACT_ADDRESS],
    },
	],
});

useEffect(() => {
	if (isSuccess) {
	  const decimals = data?.[0] ?? 18;
	  const stakable = Number((data?.[1] as bigint) ?? 0) / 10 ** decimals;
	  const staked = Number((data?.[2] as bigint) ?? 0) / 10 ** decimals;
	  setAmountStakable(stakable);
	  setAmountStaked(staked);
	}
}, [data]);

useEffect(() => {
      setAmountToStake(0);
      setAmountToUnstake(0);
  }, [token])
Optionally, you can use the isLoading boolean to add animation while fetching values for the two
inputs, "Stake" and "Unstake":
<Input
  id="amountToUnstake"
  value={amountToUnstake}
  className={isLoading ? " animate-pulse" : ""}
  onChange={(e) => {
    const value = Math.min(
      Number(e.target.value),
      amountStaked
    );
    setAmountToUnstake(value);
  }}
  disabled={disabled || amountStaked === 0}
  type="number"
/>
If you choose a token on your dapp now, the frontend automatically fetches the token decimals, available balances, and staked balances.
9. Send a transaction
You can now handle the deposit and withdraw transactions.
Prepare and send a transaction using the useWriteContract hook:
import { useAccount, useReadContracts, useWriteContract } from "wagmi";
import { Check, ChevronsUpDown, Loader2 } from "lucide-react";

// ...

// StakingCard:
const { writeContract, isPending } = useWriteContract();

return (
	//...

  <Button
    className="w-full mt-4"
    onClick={() => {}}
    disabled={disabled || amountStakable === 0}
  >
    Stake
  </Button>
{(data?.[3] ?? 0) < amountToStake * 10 ** (data?.[0] ?? 18) ? (
  <Button
    className="w-full mt-4"
    onClick={() =>
      writeContract({
        abi: erc20Abi,
        address: token,
        functionName: "approve",
        args: [
          CONTRACT_ADDRESS,
          BigInt(amountToStake * 10 ** (data?.[0] ?? 18)),
        ],
      })
    }
    disabled={disabled || amountStakable === 0 || isPending}
  >
    {isPending ? (
      <Loader2 className="animate-spin" />
    ) : (
      <p>Approve</p>
    )}
  </Button>
) : (
  <Button
    className="w-full mt-4"
    onClick={() =>
      writeContract({
        abi: CONTRACT_ABI,
        address: CONTRACT_ADDRESS,
        functionName: "stake",
        args: [token, amountToStake * 10 ** (data?.[0] ?? 18)],
      })
    }
    disabled={disabled || amountStakable === 0 || isPending}
  >
    {isPending ? (
      <Loader2 className="animate-spin" />
    ) : (
      <p>Stake</p>
    )}
  </Button>
)}

	//...

  <Button
    className="w-full mt-4"
    onClick={() => {}}
    disabled={disabled || amountStaked === 0}
  >
    Unstake
  </Button>
  <Button
    className="w-full mt-4"
    onClick={() =>
      writeContract({
        abi: CONTRACT_ABI,
        address: CONTRACT_ADDRESS,
        functionName: "withdraw",
        args: [token, amountToUnstake * 10 ** (data?.[0] ?? 18)],
      })
    }
    disabled={disabled || amountStaked === 0 || isPending}
  >
    {isPending ? <Loader2 className="animate-spin" /> : <p>Unstake</p>}
  </Button>

	//...
)
You can now stake and unstake from the list of allowlisted tokens.
This tutorial demonstrated using read and write operations in the frontend.
Most Wagmi hooks return additional data such as isLoading or error, which are useful for building
more complex frontends.
See the Wagmi documentation for more information.
Next steps
-
As an optional exercise: Listen for events to dynamically update the frontend. (You can use
watchContractEventorwatchAsset.) -
See Solidity by Example, which is a useful website when creating smart contracts.
-
See the full example dapp on GitHub.