Build a marketplace dapp
Decentralized marketplaces are one of the most popular types of web3 dapps, and enable users to buy and sell items directly on the blockchain while removing the need for any intermediaries.
This tutorial walks you through building a simple marketplace dapp.
Prerequisites
- Install Node.js and a package manager (this tutorial uses pnpm).
- Create an Infura API key.
- Install the MetaMask wallet and fund it with Linea Sepolia ETH.
Steps
1. Set up your project
Start by initializing a monorepo. A monorepo is a software development strategy where code for multiple projects is stored in a single version controlled repository.
Create a new directory for your monorepo and initialize it:
mkdir web3-marketplace-linea
cd web3-marketplace-linea
pnpm init
Create a pnpm-workspace.yaml file in the root to define your workspace structure:
packages:
  - 'packages/*'
Your workspace file structure will look like this:
packages
├── site          # Frontend built with Next.js, Tailwind CSS, and Shadcn UI
└── blockchain    # Smart contracts using Hardhat
Go to the blockchain directory and initialize a Hardhat project.
cd blockchain
npx hardhat --init
You'll be prompted with several options:
? What do you want to do? …
❯ Create a JavaScript project
  Create a TypeScript project
  Create a TypeScript project (with Viem)
  Create an empty hardhat.config.js
  Quit
For this tutorial you'll use a TypeScript project. Hardhat will automatically install the necessary dependencies for you.
Project structure
After initialization, you'll have a project structure that includes:
contracts/: Solidity contractsignition/: Ignition deployment modulestest/: Test fileshardhat.config.js: Hardhat configuration
2. Configure .env variables
Update the .env file in the packages/blockchain directory with the following values:
# Infura API key for connecting to Ethereum networks
INFURA_API_KEY=your_infura_api_key_here

# Private key of the account to be used for deployments and transactions
ACCOUNT_PRIVATE_KEY=your_account_private_key_here
- Replace
your_infura_api_key_herewith your Infura API key. - Replace
your_account_private_key_herewith the private key of the Ethereum account you will use for deploying the contract.
3. Create the marketplace contract
Create the following marketplace smart contract:
// SPDX-License-Identifier: MIT
pragma solidity ^0.8.0;

/// @title Marketplace
/// @notice A simple marketplace contract for listing, purchasing, and transferring items
/// @dev This contract manages items, their ownership, and transactions
contract Marketplace {
    /// @notice Structure to represent an item in the marketplace
    /// @dev Each item has a unique ID, name, price, seller, owner, and sale status
    struct Item {
        uint id;
        string name;
        uint price;
        address payable seller;
        address owner;
        bool isSold;
    }

    /// @notice Total number of items listed in the marketplace
    uint public itemCount = 0;

    /// @notice Mapping of item IDs to Item structs
    mapping(uint => Item) public items;

    /// @notice Mapping of owner addresses to arrays of owned item IDs
    mapping(address => uint[]) public ownedItems;

    /// @notice Lists a new item in the marketplace
    /// @param _name The name of the item
    /// @param _price The price of the item in wei
    /// @dev Increments itemCount and adds the new item to the items mapping
    function listItem(string memory _name, uint _price) public {
        require(_price > 0, "Price must be greater than zero");

        itemCount++;
        items[itemCount] = Item(itemCount, _name, _price, payable(msg.sender), msg.sender, false);
        ownedItems[msg.sender].push(itemCount);
    }

    /// @notice Allows a user to purchase an item
    /// @param _id The ID of the item to purchase
    /// @dev Transfers the item's price to the seller and updates ownership
    function purchaseItem(uint _id) public payable {
        Item storage item = items[_id];
        require(_id > 0 && _id <= itemCount, "Item does not exist");
        require(msg.value == item.price, "Incorrect price");
        require(!item.isSold, "Item already sold");
        require(msg.sender != item.seller, "Seller cannot buy their own item");

        item.isSold = true;
        item.seller.transfer(msg.value);

        // Transfer ownership
        _transferOwnership(_id, item.seller, msg.sender);
    }

    /// @notice Internal function to transfer ownership of an item
    /// @param _id The ID of the item
    /// @param _from The current owner's address
    /// @param _to The new owner's address
    /// @dev Updates the item's owner and adjusts the ownedItems mappings
    function _transferOwnership(uint _id, address _from, address _to) internal {
        Item storage item = items[_id];
        item.owner = _to;

        // Remove item from the previous owner's list
        uint[] storage fromItems = ownedItems[_from];
        for (uint i = 0; i < fromItems.length; i++) {
            if (fromItems[i] == _id) {
                fromItems[i] = fromItems[fromItems.length - 1];
                fromItems.pop();
                break;
            }
        }

        // Add item to the new owner's list
        ownedItems[_to].push(_id);
    }

    /// @notice Allows the owner to transfer an item to another address
    /// @param _id The ID of the item to transfer
    /// @param _to The address of the recipient
    /// @dev Calls the internal _transferOwnership function
    function transferItem(uint _id, address _to) public {
        Item storage item = items[_id];
        require(_id > 0 && _id <= itemCount, "Item does not exist");
        require(msg.sender == item.owner, "You do not own this item");

        _transferOwnership(_id, msg.sender, _to);
    }

    /// @notice Retrieves all item IDs owned by a specific address
    /// @param _owner The address of the owner
    /// @return An array of item IDs owned by the specified address
    function getItemsByOwner(address _owner) public view returns (uint[] memory) {
        return ownedItems[_owner];
    }
}
This contract provides a basic framework for a decentralized marketplace where users can list items for sale, purchase items, and transfer ownership of items. It maintains a record of item ownership and ensures that only valid transactions can occur.
This image illustrates the concept of the smart contract:
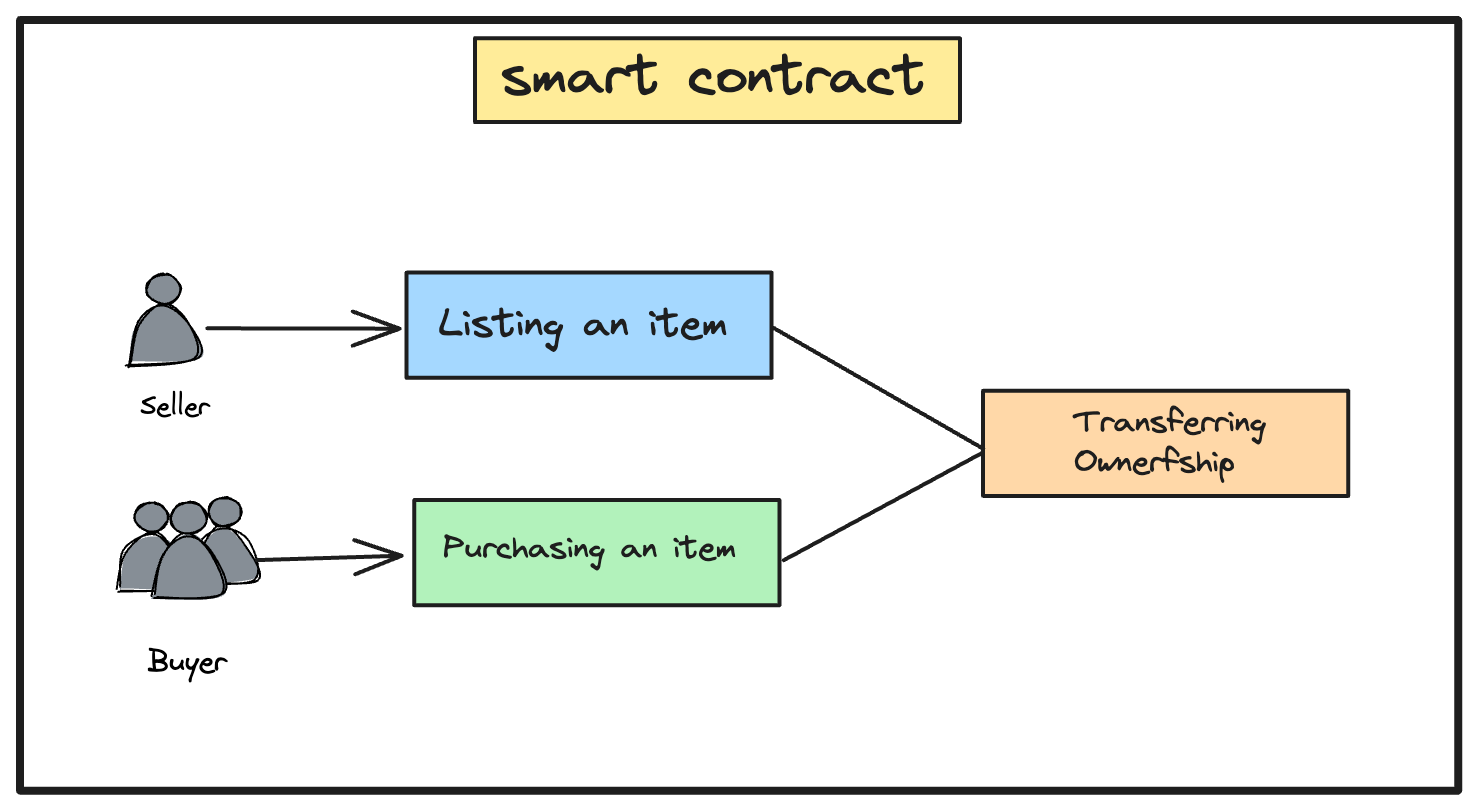
- Seller:
- Listing an item:
- Sellers can list items for sale by calling the
listItemfunction. - This function requires a name and price for the item.
- The item is added to the marketplace with a unique ID, and the seller is recorded as the owner.
- Sellers can list items for sale by calling the
- Listing an item:
- Buyer:
- Purchasing an item:
- Buyers can purchase items using the
purchaseItemfunction. - The function checks that the item exists, the price is correct, and that the item is not already sold.
- The payment is transferred to the seller, and ownership of the item is updated.
- Buyers can purchase items using the
- Purchasing an item:
- Transferring ownership:
- Ownership transfer:
- The
_transferOwnershipfunction handles the internal logic for transferring item ownership. - It updates the owner in the
itemsmapping and adjusts theownedItemslists for both the previous and new owners.
- The
- Manual transfer:
- The
transferItemfunction allows current owners to transfer their items to another address. - It ensures the sender is the current owner before calling the
_transferOwnershipfunction.
- The
- Ownership transfer:
- Retrieving owned items:
- Get items by owner:
- The
getItemsByOwnerfunction returns a list of item IDs owned by a specific address.
- The
- Get items by owner:
This smart contract facilitates a decentralized marketplace where items can be listed, purchased, and transferred securely, with all transactions and ownership changes recorded on the blockchain.
4. Deploy the contract
In the ignition folder, create Marketplace.ts to deploy the contract.
Add the following code:
import { buildModule } from "@nomicfoundation/hardhat-ignition/modules";

const MarketplaceModule = buildModule("MarketplaceModule", (m) => {
  // Deploy the Marketplace contract
  const marketplace = m.contract("Marketplace");

  // Return the deployed contract instance
  return { marketplace };
});

export default MarketplaceModule;
Compile the contract by running the following command in the blockchain directory:
npx hardhat compile
Deploy the contract on Linea Sepolia by running the following command from the blockchain directory:
npx hardhat ignition deploy ignition/modules/Marketplace.ts --network linea-testnet
Alternatively, you can add a deployment script to your package.json to simplify the process.
Add the following line in the "scripts" section:
"deploy:testnet": "npx hardhat ignition deploy ignition/modules/Marketplace.ts --network linea-testnet"
Then, you can deploy the contract by running:
pnpm run deploy:testnet
After deployment, you'll receive the contract address. Save this address, as you'll need it when integrating with the frontend.
5. Set up the frontend
You'll set up your project frontend using Next.js with shadcn/ui.
Create and navigate to the site directory:
mkdir site
cd site
Initialize a Next.js project:
npx create-next-app@latest .
When prompted, choose the following options:
- TypeScript: Yes
- ESLint: Yes
- Tailwind CSS: Yes
src/directory: No (or Yes, if you prefer)- App Router: Yes
- Import alias: Yes (default @/*)
Install shadcn CLI:
npx shadcn@latest init
Install the necessary UI components like buttons, cards, and input fields as needed.

6. Configure Wagmi and MetaMask SDK
Create a wagmi.config.ts and add the following code:
import { http, createConfig } from "wagmi";
import { lineaSepolia } from "wagmi/chains";
import { metaMask } from "wagmi/connectors";

export const config = createConfig({
  chains: [lineaSepolia],
  connectors: [metaMask()],
  transports: {
    [lineaSepolia.id]: http(),
  },
});
You'll use Wagmi and MetaMask SDK to connect your wallet and make transactions.
You just need to create a ConnectWallet.tsx UI component.
7. Add contract constants
In the site/src directory, create a file called constants.ts and add the following:
export const CONTRACT_ADDRESS = // Paste deployed contract here
export const ABI =
  // Paste the ABI here
- Use the contract address you obtained after deployment.
- Find the ABI in the
artifactsfolder generated by Hardhat after compilation.
8. Create app/page.tsx
Update app/page.tsx with the following code.
These sections explain the key aspects in more detail:
React and hooks usage
import { useState, useEffect } from "react";
import { useAccount, useWalletClient } from "wagmi";
- The component uses React's
useStatefor local state management anduseEffectfor side effects. - It also uses custom hooks from Wagmi (
useAccountanduseWalletClient) for blockchain wallet integration.
State management
const [items, setItems] = useState<any[]>([]);
const [ownedItems, setOwnedItems] = useState<any[]>([]);
const [newItemName, setNewItemName] = useState("");
const [newItemPrice, setNewItemPrice] = useState("");
- Multiple state variables are defined to manage the component's data.
itemsandownedItemsare arrays to store marketplace items.newItemNameandnewItemPriceare for form inputs when listing a new item.
useEffect for data loading
useEffect(() => {
  loadItems();
  loadOwnedItems();
}, []);
- This effect runs once when the component mounts.
- It calls
loadItemsandloadOwnedItemsto populate the state with data from the blockchain.
Smart contract interaction
const loadItems = async () => {
  try {
    const itemCount = await client.readContract({
      address: CONTRACT_ADDRESS,
      abi: ABI_STRING_ARRAY,
      functionName: "itemCount",
    });
    // ... (fetching individual items)
  } catch (error) {
    console.error("Error loading items:", error);
  }
};
- This function reads data from the smart contract using
client.readContract. - It first gets the total item count, then fetches details for each item.
Writing to the blockchain
const listItem = async () => {
  try {
    if (!walletClient) return;
    const { request } = await client.simulateContract({
      // ... contract call details
    });
    await walletClient.writeContract(request);
    loadItems();
  } catch (error) {
    console.error("Error listing item:", error);
  }
};
- This function writes data to the blockchain (listing a new item).
- It first simulates the contract call, then uses
walletClient.writeContractto execute the transaction.
UI components and styling
<Card className="p-4 sm:p-6" key={index}>
  <li key={item.id} className=" p-4">
    <p><strong>Name:</strong> {item.name}</p>
    {/* ... other item details */}
    <Button
      variant="outline"
      onClick={() => purchaseItem(item.id, item.price)}
      className="border-2 border-green-500 text-green-500 hover:bg-green-500 hover:text-white py-2 px-4 rounded  duration-200 hover:shadow-xl"
    >
      Purchase
    </Button>
  </li>
</Card>
- The component uses custom UI components like
CardandButton. - Tailwind CSS classes are used for styling (
classNameprops). - Conditional rendering is used to show/hide the purchase button based on item status and ownership.
Form handling
<Input
  type="text"
  placeholder="Item Name"
  value={newItemName}
  onChange={(e) => setNewItemName(e.target.value)}
  className="border p-2 flex-1"
/>
- Controlled inputs are used for the form fields.
- The
valueandonChangeprops connect the input to the component's state.
Error handling
try {
  // ... contract interaction
} catch (error) {
  console.error("Error loading items:", error);
}
- Try-catch blocks are used throughout the code to handle potential errors in asynchronous operations, especially during blockchain interactions.
app/page.tsx can become quite large so you can also refactor the code in the
site/src/app/components/ directory.
/components
  - ListItem.tsx
  - AvailableItems.tsx
  - OwnedItems.tsx
/hooks
  - useItems.ts
View the full code.
You can also view the refactored code.
This component demonstrates advanced React patterns, integration with blockchain technology, and modern UI practices. It showcases how to build a dapp frontend that interacts with a smart contract while providing a user-friendly interface.
9. Start your dapp
npm run dev
Your Next.js application with shadcn/ui is now running at http://localhost:3000.
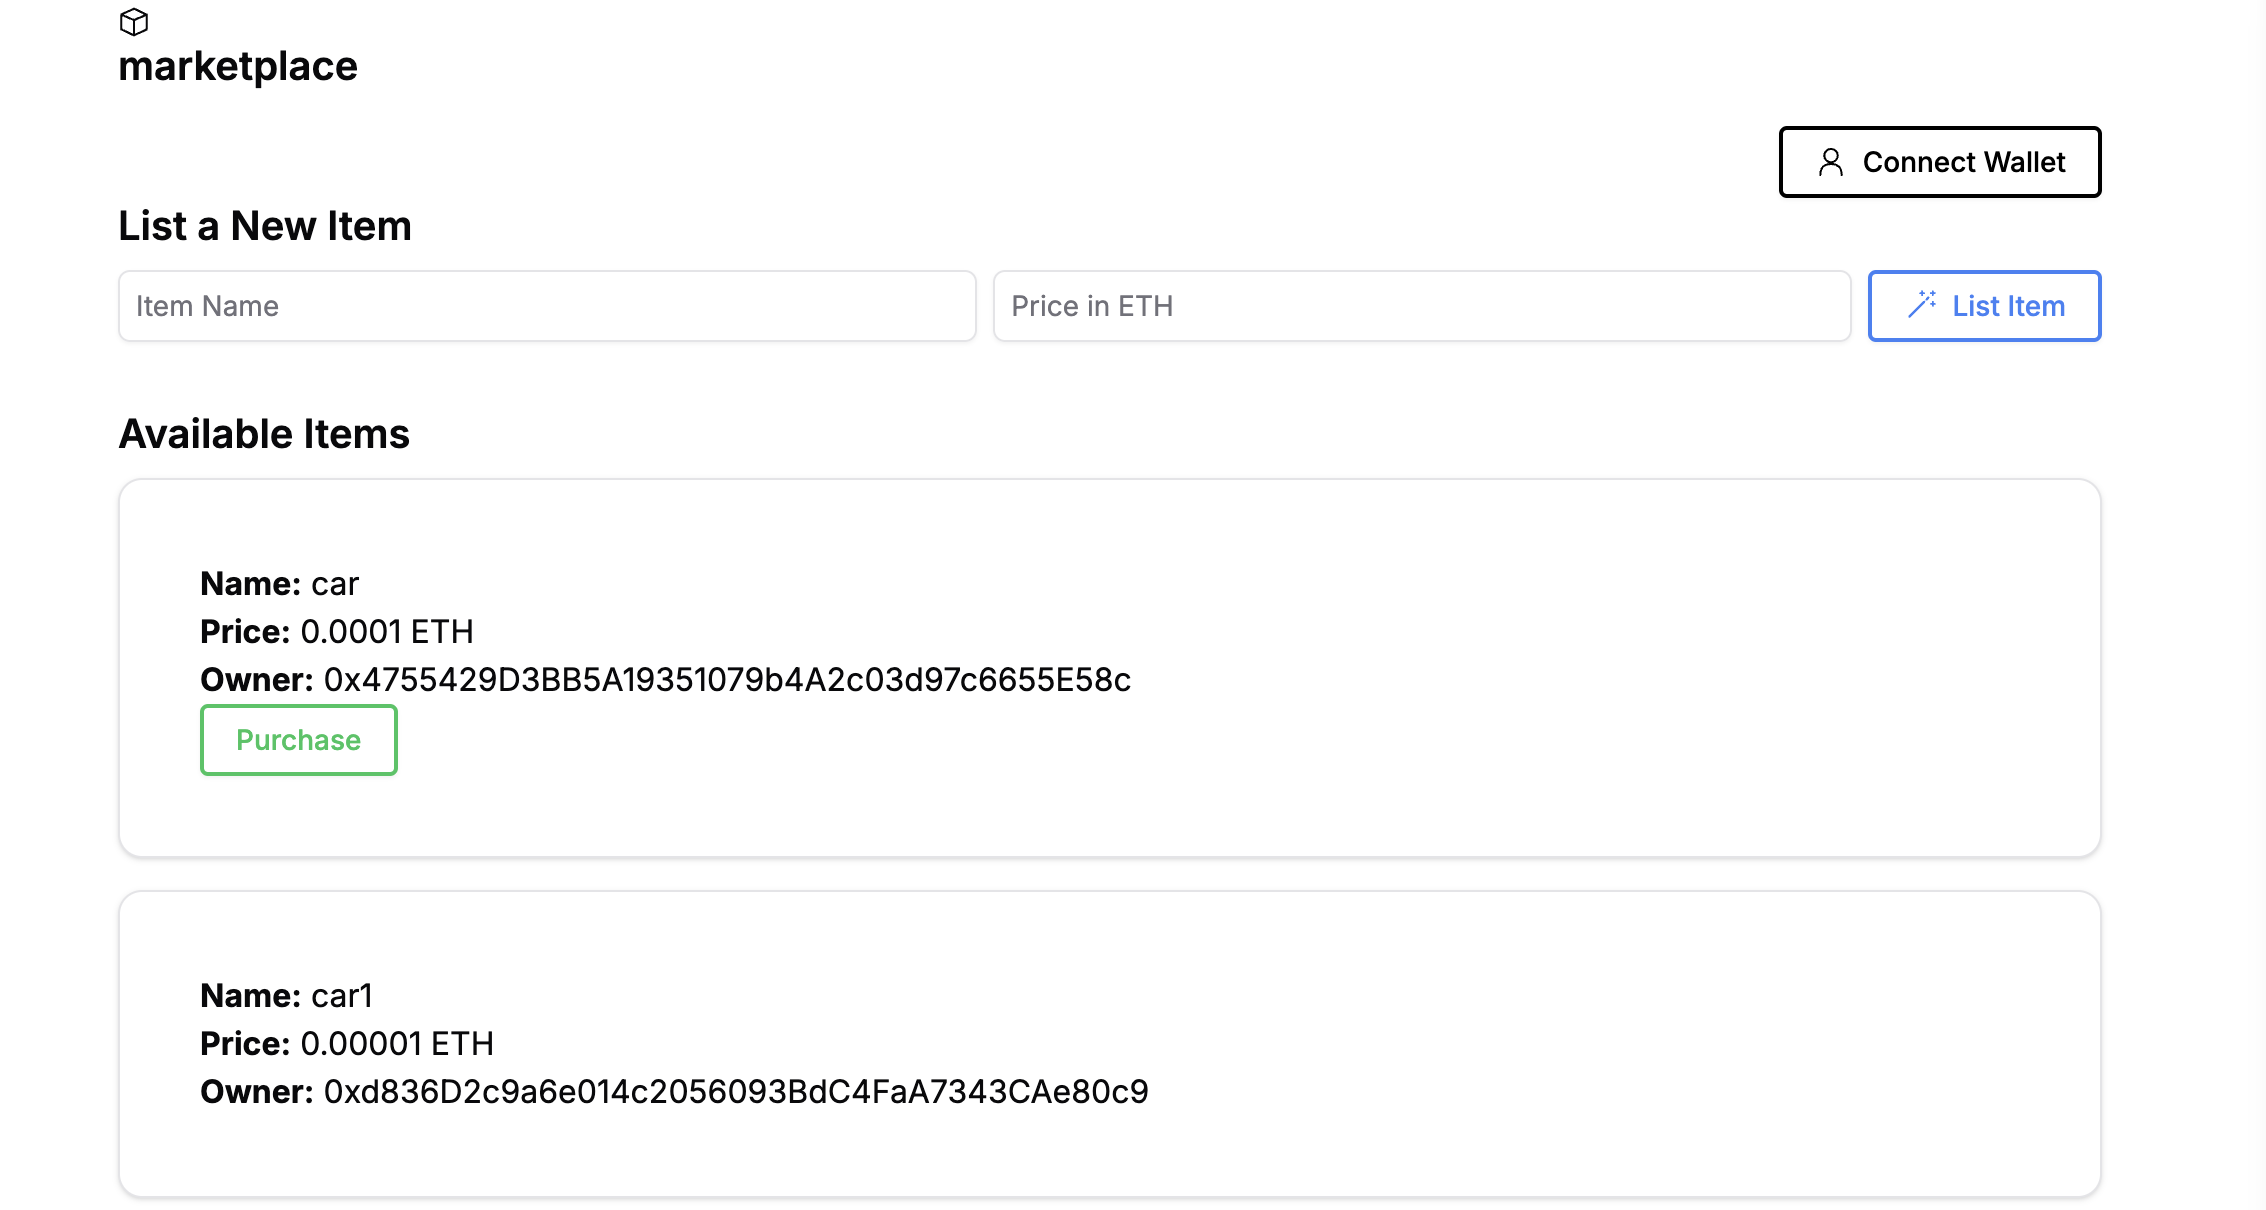
You can list an item, buy and sell, and transfer ownership.
In this tutorial, you built a simple marketplace dapp on Linea, leveraging zkEVM technology for scalability and cost efficiency.
Next steps
-
Explore further options and expand on this base with enhancements such as optimizing the user experience with additional features, or enabling bidding on items.
-
See the full example dapp on GitHub.